Showing posts with label sewing. Show all posts

Friday, January 9, 2015

Back to the Future (of the Past)

I know I've neglected this blog for a while.  Life has gotten hectic, and I've been re-discovering myself.  This year, I'm going to take the Colette Wardrobe Architect challenge.  I think it'll help me be more myself in a lot of ways.


I have too many clothes, I'll be the first one to admit.  And I didn't own a mirror in my bedroom for... quite a few years.  Especially not since I've realized that fit is a combination of feel and look.  I also feel far more confident in my sewing skills. (Not necessarily in my fitting skills, but hopefully this challenge will help me with that!)  I've just got a mish-mashed collection of things that are ~interesting~ or easy to put on.  

Well, looking nice is just as easy, most of the time.  I do love to remind people that a dress is ONE article of clothing, and pants and a shirt are TWO.  (The laziness is strong with me.)  So, I'm determined to take back my ill-fitting, weird wardrobe and turn it into the slightly retro, still wacky, properly fitting one!

See you towards the end of January!

P.S. - Oh, and I got a serger.  Lazy, well-fitting and well-finished clothes in all fabrics are in my grasp now!!

Saturday, July 12, 2014

Getting back in the sew-ing of things (hey-o!)

I'll be honest with you, readers.  I haven't been sewing much in the last year or two. I've sewn some cute, silly costumes, but they're usually a last-minute struggle against my sewing machine, not a fun and relaxing project that helps me revel in creating.  Depression has been a struggle, and I feel better than I've felt in a while.  Creativity is flowing back into me, I'm not just wrenching it out of myself anymore.  It's a good feeling.

A few weekends ago, while my boyfriend was out of town, I spent time sewing a muslin of the Colette Cooper backpack.  I'm going to make one for him in the next month or so, but I wanted to give it a run through to see where I could make it special for him and how it all comes together.

And it came together beautifully, if I do say so myself.

Top view - check out that sweet flap action!

This is the first indie pattern I've ever really used.  I have a sale-related addiction to the Big 4 (or 5?  I really like Burda, but it's really just 2 companies in the end, McCall and Simplicity.) which I am now seeing the light of the wonder of getting so much more and helping someone grow their business.

The instructions were so easy, it felt comfortable and helped me ease myself back into pattern sewing.  (I bought the Crepe pattern at the same time, so I look forward to being guided through a pretty little wrap dress as well.)

I also got suuuuuper friendly with my new pal, the edge stitching foot.  I know I need to work on the straightness of my edge stitching/top stitching, but I knew this was a muslin just for me so I didn't mind at all that things were a little wobbly/speedily done.  I'm the only one who's going to be paying any kind of attention to it.  I know I'm going to be more smooth, slow and attentive on my next sewing mission through this.

Flap open - it's got a few nice little pockets hidden under there.  I placed a bright red bird for interest.

My one main goof on this was buying 1-1/2" wide nylon webbing for the straps.  It was a last-minute run on a Sunday (when all the fabric shops in Philadelphia are closed, save one which is only going to be open a couple more Sundays..) and I forgot how smart the indication of "cotton webbing" was. (And a smaller width, too - the 1 1/2" is pretty unwieldy on a tiny person such as myself!) The straps are really uncomfortable now.  Hopefully they wear out a little bit and get more comfortable, but I'll probably just end up making little matching pads to put on them.

The handle and two straps in in the back, and a duck with weird feet

I was going to go and purchase actual muslin to do this in, but remembered how badly I need to cut back on my fabric stash, so I went shopping back in there and found this bolt of cute IKEA fabric, called Barnslig.  I know I must've bought in on clearance/as-is or something, but they sell decently sized mini-bolts (I think they're about 5 yards, by my calculation. I may have picked up another one last weekend while out shopping for nothing... I think it's going to be a cute dress.)  in these interesting prints.  I'm pretty sure they're supposed to be curtains or upholstery, but I'm one of those people who hasn't learned better than shopping in the quilting cottons for apparel, so.. there's that.  I really love this print, so instead of using the contrast for the flap like the pattern indicates, I used the main fabric for it as well.  (That, and I scrambled through my stash for just-about-enough contrast to do the bottom pieces... whoops!)

Check out this cute bear hiding in the bottom pocket!

The bottom/contrast is black taffeta that I previously used for my spaceship dress, and the lining is a red that I found.  It's a little suede-y for whatever weird reason.  It was in a remnants bin at a local fabric shop and had an interesting print, so I picked it up a while ago - for almost this express purpose - and forgot it existed.

Full of all the stuff you really need - knitting needles, iPhone cables, mascara...

The main fabric isn't structured at all, and I think this pattern needs a little something more than a lightweight cotton to dig into.  This Cooper is floppy all over, which isn't the best.  I also didn't feel like putting in the magnetic snaps, because I am lazy and it seemed a little silly at the time. (NOTE - THIS WAS A HUGE MISTAKE.  I am now holding  it together with safety pins when I over-stuff it, which may or may not be frequently when I use it.  This is not attractive or super-great for the fabric.) The flap does still keep the top of the backpack covered most of the time, but it's not secure at all.  The taffeta gives it a nice sturdy bottom, though I'm sure it'll end up getting all kinds of nicked-up and dirty soon enough.

I'm really proud of this, and it's exciting to start making beautiful and quality pieces again.  It's building up my confidence to try new things soon - like sewing knits, and working with quality fabrics instead of weird novelty prints.  (I do have like 5 yards of this AMAZING black fabric with cougar heads all over it, though... that's going to make something absurd.)  My fingers are itching to make more things and do it all well, because that little extra time I took to finish this (and the little bit more time than that I know I need to work on taking in the future) really made the difference.


Wednesday, April 24, 2013

A bag with a heart

So, today's post is about the bag I just finished yesterday.  The body of the bag has been finished for a bit, but I just had to attach the strap to make sure it was ready to go out into the world.

It's a bag with a heart!  One of my friends commissioned this bag from me, for her when she's out at burns and needs to carry her things with her and wants to do it oh-so-fashionably.  I think that she might end up using it in regular life, too, as I just see it as such a nice and functional bag.

You might notice that the heart seam at the top of the bag looks a little different left-to-right.  That's because the right hand side is hiding a secret zipper.
This is a pocket to hold sunglasses and other semi-large things that need to be easy-to-reach but kept inside a pocket.  This is the first curved zipper I've ever inserted. I was incredibly nervous and even thought about not putting this zipper in as it was.  But this was where it was requested and the only place I could really innocuously put a zipper on the front flap.  Through a little extra effort and a lot of planning, it turned out perfectly.  I love learning new techniques whenever I do a new project and I feel so much more confident having accomplished a curved zipper.

I added a series of zippers on the inside of the flap, including a water-resistant zipper (the heavy black one at the bottom).  The coils of the water-resistant zipper are backwards, almost like an invisible zipper, but with a large tab like there are on regular coil zips.  I also made a covered mirror which matches the bag and has its own special zippered pocket to live in.  These pockets are for all those little essentials - lip gloss, eye drops, car keys, cell phone, and what-have-you.
On the front of the bag - a pocket for cigarettes.  (I personally don't smoke, but my friend does, and I managed to scavenge an empty pack of Newport Reds from some smoker friend of mine.  This will now forever be my test-pack to make sure cigarette pockets are just the right size because I just think Newport Reds are some of the silliest cigarettes.)  It actually fits a lighter with the cigarettes, which is a totally awesome accidental bonus.
What's that zipper in the center back of the bag for?  That's kind of odd, right?
Nothing less than a pull-out and zip-off towel, complete with a little rose embroidered on the towel.  It fits into the large back pocket (which actually has one final zippered pocket inside, pencil-sized - for makeup, perhaps?) and can be zipped off to be washed or used elsewhere if need be.  This was at the suggestion of my boyfriend, who regrets that he can't just wash his bag's towel and must wash the whole thing.

I'm so excited to give this bag away to its owner.  I'm pretty positive she's going to love it.  She chose the lining/contrast fabric, which is actually a laminated cotton so it's waterproof and somewhat more stain-resistant as well.  It was really exciting to do a commission for someone rather than just doing sewing for myself or my boyfriend.  I'm looking to start my own Etsy shop, and this was one of the first steps out into that world.

Wednesday, November 17, 2010

I'm Fully Aware How Tardy This Post Is (Halloween 2010)

So, I know that this post is over 2 weeks late, but I've been half-busy and mostly lazy. That may also have been the reason that, despite planning, I was still sewing my costume as I left for my weekend plans.

My last post was detailing my plans for my costume, and not long after that I actually made a muslin of the pattern I found - Vogue 8508. It was the only pattern I found that had a stand-up collar of the size that Altaira's was. (There were lots of costumes with close-to-the-neck stand-up collars, but only one that reached nearly to my shoulders.) I had also bought the fabric by that same time - a gold block trim to mimic the heavily studded areas and a gold satin flecked with glitter for the main fabric. It's not quite similar, but I wanted to make it work as best I could.

The original pattern is for a wide A-line dress, not a near skin-tight dress as the original was. Though I was going to work on truly altering the pattern, I ended up just sewing the shape in - pinning and marking where to make the shape into the dress and adding a zipper (which, by the way, I used far too little of) so that it would fit like a glove, all said and done. I also meant for the dress to be a little longer than it ended up being - though it's not as lewd as I thought it might be at its current length. It was quite a simple pattern to put together - raglan sleeves attached through the collar (or a facing, should you not need a huge stand-up collar) and some simple bust darts. In its original form, it's a pretty cute 60's-inspired dress.

Here is the final product!:


This is actually just about how I wore it - there is actually a long-sleeved gold shirt underneath, and I had mustard gold tights and those little flats. And, of course, I had curled my hair to emulate Anne Francis'.

I spent my Halloween weekend down in New York City with my friend Laura - going to interesting parties, carving pumpkins and having a grand old time. One of the best events was the Phantasmagorey brunch, hosted by Dances of Vice (whose Halloween event I attended last year.) It was most of a show than a party, but all of the performers were excellent. We showed up late, but did get to see the Ghost Train Orchestra and some great burlesque performers (including one on aerial silks!). We were in an awkward spot, up in a balcony, but it was an excellent show and there were so many wonderful costumes that I wish I could've gotten a better look at.

Though no one recognized my costume, I did get some knowing "oh!"s after mentioning who I was dressed up as. It was another great Halloween, full of excitement and good friends. I can only hope that they get better as time goes on.

at the Phantasmagorey brunch

Thursday, October 14, 2010

Halloween is quickly approaching...

The decision for this year's Halloween costume was difficult for a long time - I still wanted to look fabulously vintage, but the only thing I could really think of was Judy Garland (while swilling liquor and downing placebos) - other thoughts came in and went out, but nothing really called to me.

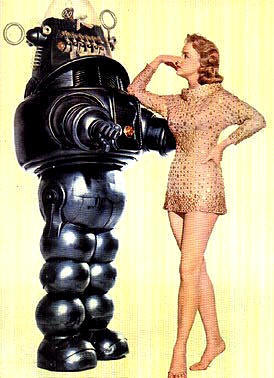
Then, just a couple of weeks ago, I watched The Forbidden Planet and I saw it:


Anne Francis' gold dress! I wish I could get someone to be my Robby the Robot, but I think that's asking a bit much at this stage. I'll probably end up with a slightly longer dress (that one could end up a bit.. immodest, to put it kindly), but I can't wait to construct and wear this iconic sci-fi dress. (I'm such a sci-fi nerd, which you probably can't tell by the rest of the posts to this blog, so I can't wait to tell people about how I live on a different planet where monsters from your Id may come to kill you. If you haven't seen The Forbidden Planet, you probably definitely should!)

I'm a little slow on the uptake, so I'm going to go out and get my pattern today (just my luck, there's also a Vogue pattern sale going on this weekend, starting today!) and start cutting out a muslin to play with the construction. I'm using Vogue 8508, which was the only pattern I saw with the large, oval, stand-up collar the dress has (and I couldn't contemplate drafting), but I will have to do some major alterations to the body of the dress, as it's not a wide A-line style.

I can't wait to break out the sewing machine again! It's been far too long!

Wednesday, May 5, 2010

I know I've been absent from posting for a while...

But life kind of got in the way! I've been taking classes at the local community college since January (on a really awful schedule, so downtime is weird) and that makes sewing inherently difficult, as I'm home less during the day.

One thing I have been doing, however, is knitting! Knitting up a storm. Hats, potholders, sweaters, mittens, all kinds of exciting things - some of which I've never done before. (Never done before = almost always a plus, I love learning new skills and techniques!) It's really easy to take knitting wherever you go, I usually make things that will fit into one of my giant purses so I can keep it crafty and creating wherever. And, I usually try to knit vintage or vintage-inspired for myself, as I do with sewing.

One project you readers might be interested in is the 1940s sweater I'm knitting - the Flash! Cable! sweater. (There's a link to the pattern for any of you knitters out there!) It's going to be a very thin but sturdy knit, as it's out of very thin yarn on very small needles. It's an exciting, if tedious, process - the smallness of the parts makes it take far longer than usual.


The pattern and materials for the Flash! Cable! sweater
(I'm using KnitPicks' Palette (100% wool) in MaiTai heather, on 1s and 3s! Eek!)


I'll be sure to post pictures of this when it's mode completed, possibly not until it's been assembled. I'm hoping it will be done by the fall, when the weather starts to turn chilly, so I can wear it with some vintage fashions I'll surely be sewing this summer!

(I have cut out abut half of my Hollywood Pattern, in white with red polka dots, but I haven't gotten around to finishing it! Maybe the prospect of a real shirt-dress, with buttons all down the front is what's intimidating, or the fact that I'm not sure if it will fit or not... I really hope it does! Puffy sleeves and all-white contrasting collar and cuffs? I need it to work!)

(Oh, and I have been buying some vintage-inspired shoes.. including some wingtip-looking shoes I actually got from Kmart! I'm wearing them with my vintage dresses now that the weather is finally letting us know it's spring!)

Thursday, December 3, 2009

Simplicity 5030, or The Dino Blouse

I have finished it, photographed it and - despite having computer troubles for a couple of weeks that I won't bother to get into - gotten the photos to finally present to you: The Dinosaur Blouse. Appropriate for many occasions, especially job interviews and other places one needs to be fancy. Fancy with dinosaurs.

From The Year 2050

This blouse started as fabric my mother bought me when I was away at college. It wasn't much - a little over a yard - and so I constantly wrestled with what I would make out of it. A pencil skirt, maybe? Maybe... something else? Then, it hit me: a blouse! It would be just enough to make a blouse and it would be fun.

So I used the pattern I've used before, with the Peter Pan collar, because it had a nice fit (and it may have been the only vintage shirt pattern I really had at the time), and whipped it together relatively quickly. (I only noticed the pattern was upside down after cutting the first piece.. but you can't really tell because half of the patterning is sideways anyhow. Oh, well!) Unfortunately, I didn't have any buttons. And I needed buttons.. dinosaur buttons.

From The Year 2050

I was sure they had them, that they existed, but it probably took me a month or so of intermittent trips until I finally found some La Mode stegosaurus buttons. Not quite what I'd remembered, but the only dinosaur buttons I'd found or probably would find.

I anxiously stitched them on and made the buttonholes (which I think I've gotten much better at - maybe I can make a button-all-the-way-down dress now!) and put it on. At first I was going to match the dinosaurs so that the pattern would run evenly, but the fronts aren't quite straight, so they are what they are.

Check out those stego-buttons!
From The Year 2050


I love it and I'm so glad I found something wearable to make out of this. The sleeves need to be shortened, but I guess this is a trend I'll have to deal with when making vintage patterns. The shirt makes me feel hip and nerdy and vintage and it's perfect. Ah, it feels good to have a dino blouse!

Saturday, October 31, 2009

Vogue 2609, or How To Halloween

What is the best fabric to make a muslin out of? Just plan muslin? Some old fabric laying around? Or could it be $2-a-yard purple satin?

I went with the last option for this year's Halloween cosutme: Vogue 2609. A 1934 design, I wanted to look my best for the party. Now, I didn't plan this costume out well in advance. Oh, no. I barely knew what I was doing a week before and had no idea what I would be that night. When I found out it was an Edward Gorey-themed party (hosted by the lovely Dances of Vice), this pattern immediately jumped out from my memory. Maybe not so turn-of-the-century as Gorey, but certainly in a fabulous and macabre feeling, if made in the proper way.

Awkwardly brushing out the edges of the
caplet featured in this pattern


I've never sewn this pattern before, but I was confident in my sewing skills, so I cut out all of the pieces (including two of the godet pieces the same way - so in the final product you may or may not notice that one of the back pieces is ... not as shiny as the rest of the dress, because it's sewn in backwards) and set to work on sewing it all together.

The open-back design!
(That tie at the bottom is supposed to be
tacked down - pshaw, it's fine!)


What I noticed, looking at the pattern back (which I did not have the convenience of doing while I was at the fabric store, the pattern being out of print) was that it didn't have a zipper. I had bought one anyway because I figured it needed to be closed somehow. Well, this being 1934, they didn't exactly have zippers. They had snaps. And I wasn't going to put in a whole long set of snaps, because I like simple solutions. So, I ignored that part of the directions and did it my way, putting in my zipper. I felt happy to have bested the patterns of the past with the technology of the future.

The next part that unsettled me, in reading the directions, was the fact that the godet (the skirt part at the very bottom) was supposed to be appliqued on. Again, I was not doing this and decided to do it my own way, which I saw as the correct way. I just sewed the godet to the dress, as one would do - right sides together, make sure to get it all pinned down, sew together, turn right side out. (I was kind of nervous that the applique-style attatchment might not work as well, for some reason, and so I just felt more comfortable putting the skirt in the way I did.)

The last surprise of this dress was the contrast fabric. When I was getting it cut, they told me the price, which was far more than the dress fabric. I thought it was right-side out on the bolt, because it was satiny, and just said "Whatever" and went with it. Well, after I cut the pieces for the dress and went to get them ready to attatch, the two halves of the fabric didn't want to come apart. I took a pin and separated some of the remnants from my cuttings and learned - a bit to my horror - that this was no satin at all. This was some kind of terrible, weird Latex-coated fabric. There was no turning back, though, as this was probably a day or two before and I didn't want to get anything else. I would deal with it and triumph over it, as I had with the rest of this dress.

But I think, in the end, it turned out quite spectacularly in the end. I was happy to tell people that I'd made my dress, and though I personally don't have any photos of myself at the event, I did find one from someone else where I'm in the background:

Photo by Gabi Porter for MetroMix New York
(more photos here)


Yep, right there. On the right, with my lovely open back and my friend who came with me to the most magnificent Halloween party I'll probably ever attend. I hope to go more of their events sometime, just to see all the people who get so done-up! (You should search for more images and just look at all the gorgeous things people wore. Really. I was amazed.)

Tuesday, October 27, 2009

Advance 2709

Sorry I haven't been sewing! There's been lots of work going on at home, hence why I have only just finished hemming and photographing my newest creation, Advance 2709.

I love this pattern! Its set-in, diagonal pockets. Its six-gored skirt. The fact that it has a provision for just a shirt-waist dress as well as the full shirt dress. (I only had four buttons, so I went for the shirt-waist. Also, I hate making button holes but love shirt-waists, so... that's also a reason.)

From The Year 2050

The back of this dress has a nice yoke and gather detail and the sleeves came out quite puffy as well, which gives the dress almost a '40's style feel to the dress that looks far more '60s on the envelope. Perhaps this is also because of my height and the length that the dress ended up being. But I think this came out splendidly. I found this fabric, with its great pattern, on sale and I think this will end up being my go-to dress next summer. The fabric is really a quite thin cotton, but the fit is wonderful - it comes in close at the waist but it isn't uncomfortable.

Ah! I just can't get enough of it. I can see myself sewing this pattern again and again, but I'll probably take some length off if I make it in a solid.

Here are some more photos in a sort of natural-ish light, showing front and back.

From The Year 2050

Thursday, September 10, 2009

Simplicity 3085

I decided to make a dress from one of the two patterns I won back in June, Simplicity 3085. I found an old plaid that I'd bought a while ago and thought that it would go really well with the general design of this dress.

From The Year 2050

It ended up being a bit big on me, as the pattern was for a bust 35, but it's kind of like having a comfortable house dress instead of a totally fashionable day dress. It still has a really interesting look and is nice to wear around.

From The Year 2050

The only real problem I had in this dress - besides almost not having enough fabric and having to cut the collar in two pieces instead of on a fold - was the bottom part of the button detail. It's supposed to mirror the top where it just juts out slightly for the buttons, but the details were awkward and now it just kind of bunches up there. I couldn't get it to point like the top does, no matter how I tried. If I remake this, I'll try to figure out my own way of doing it instead of reading the directions exactly, as they were really quite confusing anyhow.

I also ran out of enough fabric to make the pockets, so I made it out of some leftover orange polka dot you might recognize. I like them, though. They make me feel kind of like I have the pockets of an old timey hobo. (I also originally put those in the waist seam backwards so that my hands would have to go backwards to sit in them. That was an easy fix.)

From The Year 2050

Through this project I've also become a more confident buttonhole-er and that's a very exciting possibility! I really like the fabric of this dress and I'll probably wear it out anyhow, just putting a belt around the waist to tighten it up. It was generally an enjoyable and simple dress to sew, except for that one teeny detail. There's pleating above and below the waist and I think it's generally a very pretty pattern.

Wednesday, August 12, 2009

Butterick 5032

Home from my recent vacation and I was itching to get sewing again. I had already cut the fabric for everything but the facings before I left, but we took the machine in for servicing so I couldn't start sewing.

I was excited to see how this wiggle-style dress would turn out - I thought it might be nice to have a slimmer dress in my wardrobe and I thought that it was one of the few patterns that the "running eighths" style fabric would work with.

From The Year 2050

Knowing the danger of modern patterns (this is one of the modern reprints of older Butterick patterns) I checked the measurements on the tissue and, lo-and-behold, I had to cut it a size smaller. I probably could've gone down another size on the top of the pattern - it does gap a bit around the top, tending to be more on the back.

From The Year 2050

I only noticed it as I was sewing the top and bottom together, but I had cut the whole top on the same four patterns of the running eighths and the bottom on all eight. Therefore, the whole front matches, but the back doesn't. I still think it makes a nice effect and I matched the lines dividing the patterns almost perfectly, so the effect isn't as bad as it might've been. (Also, I need to iron it.)

Overall, I really like the outcome of the pattern. It turned out a bit long on me (maybe I just have a taste for shorter skirts, but down to mid-calf is not very appealing on the petite figure) so the kick pleat in the back is a bit useless, but I think it's quite a flattering pattern. The front pleats on the skirt section are new to me, but I kind of like them. When holding the partially-finished top to myself, I thought the neckline was a bit high, but it's actually not too bad. I am a fan of the square neckline and I find the neckline on the back to be very flattering, probably on many people. I'd probably sew this again if I need another wiggle-style dress!

Tuesday, July 7, 2009

Vogue 2962

Another of my older dresses, Vogue 2962, is one of my favorites. A challenge that definitely paid off.

From The Year 2050


I originally saw the skirt fabric at Jo-Ann's and fell in love. I remembered this pattern, having just recently bought it, and decided it would make a great skirt. I did eventually have to go back for more (this pattern doesn't think you'll be using a border print - which this is) for the giant 5+ yards in the skirt. The top is a heavier cotton than the skirt.

From The Year 2050


Not shown here, but the top button is actually a small rose, to correspond to those in the skirt. These buttons and loops were the worst part of the dress - I kept sewing the loops in the wrong place or some of them were stitched down really awkwardly or too tight and I had to redo them probably 4 or 5 times. (Sometimes I can be really bad at spacial things, like where closures go and the logistics of them.) I knew that these were the buttons I wanted - shank buttons that were glossy and shiny and white.

The only alteration I made - besides the length (which, with Vogue, must be for models as I always seem to take like 9" for my being 5'1") was tightening of the bodice panel. It fits more like the pattern image now and feels better all around.

I may end up making this again, but probably not for a long while, and not until a fabric calls out to me again like this one did.

The only qualm I have about it is that it's pretty hard to wear a bra with as the back of the bodice is a bit low and shows the whole back of a bra. It's a lined bodice, but still, sometimes it can be a bit awkward. But the adjusted fit around the middle, the huge skirt and the halter top are so great and Seven-Year-Itch-y! I just love it. (I didn't wear it on the Fourth of July, but I do like to refer to it as my America dress as it's red, white and blue.)

Monday, July 6, 2009

Butterick 4919

This continues a short series of projects I've had finished for a while but am only just getting around to blogging. (I've actually only just finished fixing the hem, which was an atrocity of shortening and not properly measuring. If you're going to shorten always measure and then measure again!!)

From The Year 2050

This is Butterick 4919, one of the recent "retro reprints" that Butterick was doing. Originally from 1952, it's been redone for modern sizing and such.

I really enjoy the waist/tie detail on this dress, though it is a bit awkward to figure out which piece goes over the other in the back. It's nice to have something that you can make as fitted or loose as you want and you can always change it if you eat that giant Thanksgiving meal or something.

I really like the fabric, but I'm a sucker for over-the-top things and the color orange. The fabric just called out to me from the shelf and I knew I had to make something grand with it, so I remembered this pattern and the rest was history!

The only real problem I recall with it was my attempt at shortening which left certain parts very long and others very short. Now it's a little bit below the knee and I think it's a good length for this style of dress. The only other thing I can remember is that I put the hooks and eyes on half-backward at first so they closed in a really bizarre way, but that was an easy fix. The front straps actually have little pleats in them (I don't remember if the pattern just calls for gathering or for pleats, but I did it this way) and they're a really nice detail.

I might make it again, who knows, but I'd like to somehow alter the way the sash goes around the front so it's more sleek.

Wednesday, July 1, 2009

Simplicity 5006, or the rite of passage of every vintage sewer

I've done it. Using the modern Simplicity 5006, I've made a crinoline. And it was all the horrors of netting snagging on itself and figuring out how to gather the giant skirt (machine gathering worked far better than hand-gathering). But, now it's done! I'm so excited to finally have one!

The finished product.. almost


Instead of shelling out anywhere from $25 to $50 (I know, not that much of an expense..) I bought 5 yards of bright orange netting from Jo-Ann's, on sale for only $1 a yard, and some left over muslin for the yoke, and made myself a crinoline.

It's taken a frustrating day and half - the netting constantly catching on itself, gathering and regathering, and having to do that for two layers. I looked at the instructions and understood them, but I followed what I saw as the best course of putting it together anyway. The wrong sides are facing one another so that the netting doesn't snatch at my dresses or any slips I'd want to wear (and hopefully won't bother my skin as much, either.)

Well, here's what happens when you take a normal dress [Vogue 2902, Christmas editon] (left) and put a crinoline under it (right):


It's like retro magic!

I still have to bias tape the edges and cut it a little shorter so it doesn't poke out from under my dresses quite so much, but I'm so excited!!

Friday, June 26, 2009

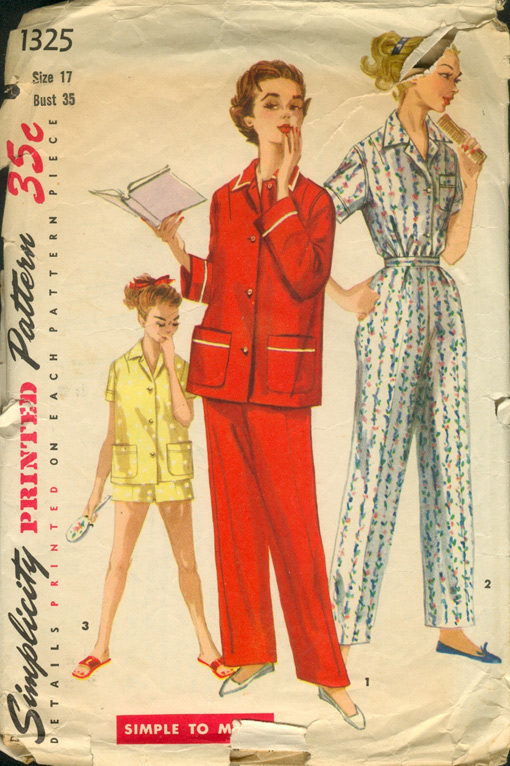
Simplicity 1325

The other day I finally finished my most recent project: Simplicity 1325.

I was really excited to get this pattern when I did - it was on sale on eBay for only $1! I made the view with long pants and I was hoping for long sleeves, but I laid the pieces out wrong and ended up with only enough fabric for short ones. I'm alright with that, though, and I think they still look great. It's probably more comfortable this way, anyhow, with the lightness of the broadcloth I made them in.

From The Year 2050

The pants come up to the waist and have a button closure on the left - a very vintage detail. The waistband is slim itself and the closure end has a point to it, which I find to be a really nice touch.

From The Year 2050

Though the short sleeved top didn't have the bias tape detail on the collar or sleeves, I really like the look of it so I added it anyway. The collar is a bit of a mess - I haven't made one like this before, where you cover the edge where the collar joins the body with the top part of the collar. It didn't turn out too well

From The Year 2050

As you can see in this photo, the pockets and bias detail are actually straight when one's hands aren't in them. The pants came out at a really complementary length and the pleating is really nice. I used white thread throughout the project (though I strangely don't have much and kept almost running out) so there's that slight repeat to the contrast of the white of the bias tape against the green. I also altered the position of the buttons because the collar didn't come out quite right and I wanted to make sure I could unbutton the top button or two (well, where they would've been) to breathe and it wouldn't look lewd.

Once I figure out how better to sew these kind of collars, I'd be happy to make this again. I just love the retro styling and the bias detail. It's so kitschy and you just can't find it nowadays! I'd give it a 8.5/10.

Tuesday, June 9, 2009

Vogue 2267

Vogue 2267 or, "Why yes I do have five dresses made from the same pattern."


(And a cat.) Count 'em and weep. The top one was actually my very first sewing project not done in middle school. I, for some reason, like to get very ahead of myself so I decided to make a dress with princess seams, a zipper and two pockets (one of which is actually on the zipper). It actually came out really well and I still like and and wear it. I put the inside belt on this one, so it's not very good for eating in, but it does look and feel good otherwise.

The other four have a more interesting story. Last summer, I took a service learning trip to Ghana in West Africa. They told us that the culture there was very strict and girls were expected to wear skirts or dresses everyday. So, I remembered this great pattern (as I'd had a lot of trouble finding modest dresses that would hide my bust in mainstream stores) and how good it looked and its pockets. I'd made several dresses between my first and these and was able to whip them all up in about a week and a half. Made of quilter's cottons, I made them in four different colors so I'd have some versatility and wouldn't get bored. They all have very small patterns and I still wear those, too.

(On the teal one, you might notice that it's discolored - that's because I got into a mudfight with it on and didn't wash it out right away. I don't know how much better it would've come out if I did. Oh well.)

Here they are, the parade of champions. (The first two are the same dress - the first one I made.)
From The Year 2050


From The Year 2050


From The Year 2050

This is a pattern I'd suggest to pretty much anyone. It's probably better for more advanced sewers, but with careful instruction reading and learning what those weird terms are, even beginning sewers can be proud of this dress. The square front and back necklines I find really pretty and the pockets are always a welcome edition to a dress in my book. Though I'm sure it would look much better with a thin crinoline, it still looks great without one. It's comfortable (especially without that inner belt - unless you're really really true to measurements) and flattering.

I'd give it a 10 out of 10 every time.